Quick Start
This document describes how to create and login to your first virtual machine (also called an instance or simply server) on the HPC Cloud. To proceed you will need a user account with the OpenStack service enabled and access to a project.
Important
Projects are typically organized at the institute level, not for individual users. For questions about project creation and access to Openstack please use the helpdesk
Preparation
Login to the dashboard using your username/password and domain mpcdf. Note that the dashboard is only accessible from MPG networks.
When accessing the dashboard from external networks we advise you to use a socks proxy. A socks proxy can be started on both linux and windows based systems with your browser subsequently being configured to use the proxy.
For Linux a socks proxy can be created using ssh as follows:
ssh -D 1337 -q -C -N <username>@gate.mpcdf.mpg.de
For Windows a socks proxy can be created using PuTTY as follows:
Launch PuTTY - enter the hostname (gate.mpcdf.mpg.de) and port (22).
On the left side, in the Category window, go to Connection -> SSH -> Tunnels.
For ‘Source Port’ enter ‘1337’.
Under ‘Destination’ select the ‘Dynamic’ radio button and leave the ‘Auto’ button selected.
Press the ‘Add’ button. You should see ‘D1337’ in the ‘Forwarded ports:’ box.
Click the ‘Open’ button.
A terminal window will open allowing you to login as usual with your username/password and OTP.
Once the socks proxy has been created you can configure your browser to use it.
For Firefox Preferences-> Network Settings and create a Manual Proxy using localhost and port (1337)
For Chrome
google-chrome --proxy-server="socks5://localhost:1337" --host-resolver-rules="MAP * 0.0.0.0, EXCLUDE localhost"
For Windows Edge Settings->Open Proxy Settings and create a Manual proxy with host Address (socks=127.0.0.1) and port (1337)
To enable command line client access (once the ssh tunnel has been enabled)
export ALL_PROXY=socks5h://localhost:1337
openstack
Note: The PySocks python module may need to be installed by hand as a dependency.
Many MPG Institutes will be able to directly access the OpenStack dashboard (and the MPCDF VPN can be used as a fallback). However, if you are not able to load the page from your local institute network (or institute-provided VPN), please let us know.
Create or import an RSA SSH key pair via Project / Compute / Key Pairs. This key pair belongs to your user and will be used for SSH authentication on the servers you personally create. Please be aware that the name of the key will be visible to other users of the same project. Save the private key to your personal computer.
Example of adding a new RSA key pair locally and importing it to the OpenStack dashboard:
First, create your RSA key pair via your local terminal and save it to the desired location ($HOME/.ssh/id_rsa by default):
ssh-keygen -t rsa
Now, display the content of the public key and copy the printed content:
cat $HOME/.ssh/id_rsa.pub
Got to to the Project / Compute / Key Pairs -> “Import Public Key” and paste the copied content of teh public key into the “Public Key” field.
Modify your default security group to allow ssh-connections:
Go to Project / Network / Security Groups -> “Manage Rules” for the default security group.
Click on “+Add Rule”, choose “SSH” in the “Rule” dropdown list and click “Add”.
Important
For security reasons the private key is not stored in the system. Thus, if you don’t save it at the time it is created, there will be no way to recover it!
Create a server
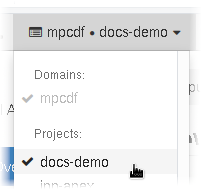
Set the active project via Identity / Projects or the dropdown menu near at the upper left as in the example shown below.
Create a new server via the
 button on Project / Compute / Instances.
A wizard will guide you through the process, as shown in the composite image below.
In this example we want a single-core server running a standard Linux distribution on a shared network, so after specifying the instance name, select Ubuntu 20.04 as the source, mpcdf.small as the flavor, and cloud-local-1 as the network.
Assuming your user has only a single key pair, it should have been pre-selected automatically.
button on Project / Compute / Instances.
A wizard will guide you through the process, as shown in the composite image below.
In this example we want a single-core server running a standard Linux distribution on a shared network, so after specifying the instance name, select Ubuntu 20.04 as the source, mpcdf.small as the flavor, and cloud-local-1 as the network.
Assuming your user has only a single key pair, it should have been pre-selected automatically.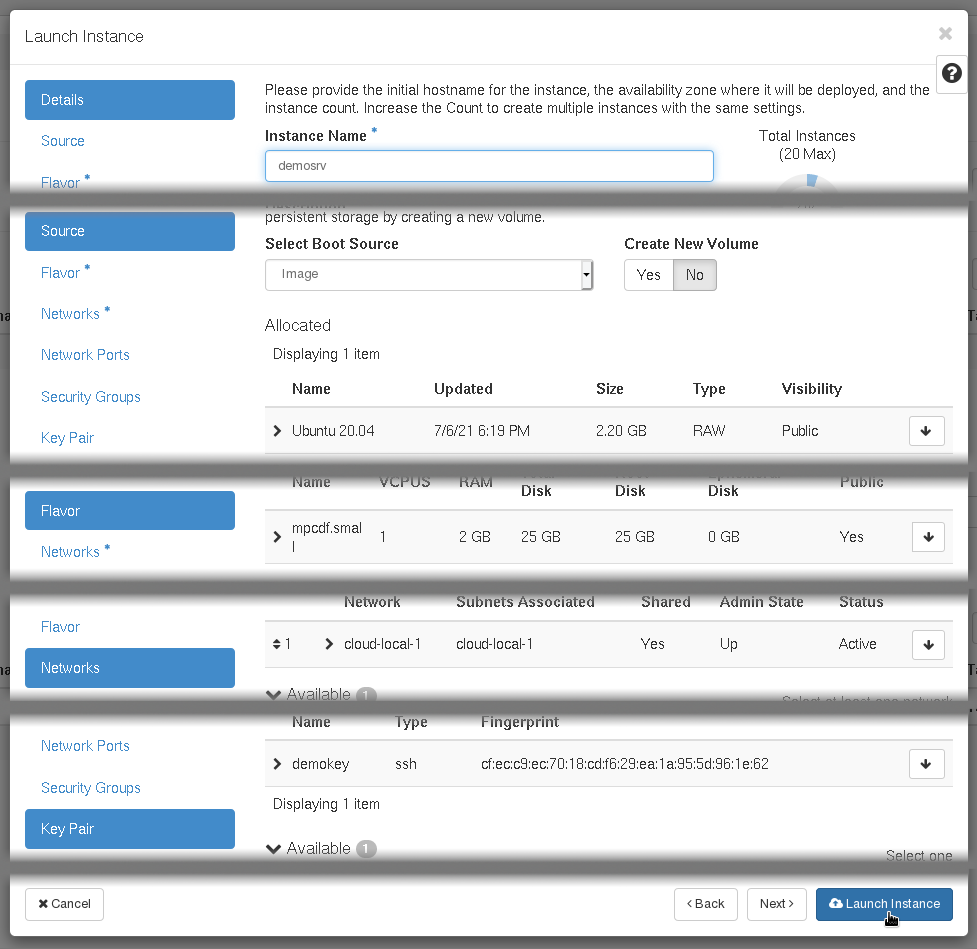
Once the server is up and running, you can login via SSH using the key pair defined above. Its randomly-assigned IP address can be found on the list of instances. Servers on cloud-local networks are already accessible from internal MPCDF networks without requiring any additional configuration. Here are several common login scenarios:
Direct login from your personal computer via the gateway machines:
ssh -i KEYFILE -J USERNAME@gate.mpcdf.mpg.de root@10.186.XX.XX
Login to the gateway machines with SSH agent forwarding…
ssh-add KEYFILE
ssh -A USERNAME@gate.mpcdf.mpg.de
…and then to the server itself:
ssh root@10.186.XX.XX
Tip
Once an instance has been launched additional users can be provided with ssh access to the root account by adding their ssh key pairs to the root user’s authorized_keys file. There is no way to inject keys via the dashboard or openstack cli.
Next steps
At this point the server may be administered like any other virtual machine. Outgoing internet access is allowed by default, e.g. for software installation and updates. Common next steps are to attach additional block storage or mount a shared filesystem
Tip
The dashboard is not the only way to manage HPC Cloud resources. Throughout the documentation there are boxes (like the one below!) containing equivalent procedures using the command line interface. Note that UPPERCASE placeholder values should be modified before running the commands and refer to names (e.g. demosrv) and not uuids (e.g. 123e4567-e89b-12d3-a456-426655440000), unless otherwise indicated.
CLI Example
openstack keypair create KEYNAME > KEYFILE
openstack server create SERVER --image "Ubuntu 20.04" --flavor mpcdf.small --network cloud-local-1 --key-name KEYNAME
After a short delay, the server’s IP address can be found with: openstack server show SERVER -f value -c addresses
- 1
Note that SplitTunnel profiles are supported, but only if the 10.186.XX.XX address range does not conflict with your institute’s local network environment.