No.208, December 2021
Contents
High-performance Computing
Termination of general user operation for Draco login nodes
As announced previously, starting from January 10, 2022 access to the Draco login nodes will be restricted to the users belonging to institutes which own dedicated Draco nodes; namely the Fritz Haber Institute, the Max Planck Institute for the Structure and Dynamics of Matter, and the Max Planck Institute for Animal Behaviour. The file systems /draco/u and /draco/ptmp will stay available on Cobra and Raven until further notice.
Renate Dohmen
Announcement of CUDA no-defaults on Cobra and Raven
Please note that in the near future you will need to specify an explicit version
when loading the “cuda” module, just as is already required for the Intel
compiler and MPI modules.
This will be enforced after the next maintenance window and a plain
module load cuda will fail, then. Instead, use
module load cuda/11.2
to load version 11.2 explicitly, for example. In case you need to load the “cuda” module for your jobs, please adapt your job scripts already now. The actual dates of the maintenances will be announced in due time.
Sebastian Ohlmann, Klaus Reuter
Usage of /tmp and /dev/shm on Cobra and Raven
On the HPC systems at MPCDF neither the /tmp file system nor the TMPDIR environment variable should be used for storing scratch data. Instead, the /ptmp directory which is accessible as a parallel file system from all compute nodes is provided for such purposes.
On the other hand some applications require access to the local file system on the compute nodes for storing temporary files. In this case the /tmp or /dev/shm directories can be used. Since RAM is significantly faster than disk storage, it is advantageous to use /dev/shm instead of /tmp for higher I/O performance. This becomes important when an application extensively uses temporary files, e.g. for interprocess communication through files. For such cases users can use the variables JOB_TMPDIR and JOB_SHMTMPDIR in their batch scripts, which are set individually for each job. For codes which use the variable TMPDIR it is recommended to set it like TMPDIR=$JOB_TMPDIR. Using the variables JOB_TMPDIR and JOB_SHMTMPDIR guarantees that all temporary files stored in these temporarily created directories will be cleaned after the job has finished. Note, that the Raven HPC cluster is a diskless system, therefore the /tmp directory can be used only for files which do not exceed 2 GB in total.
Mykola Petrov
Eigensolver library ELPA
Further enhancements of the eigensolver library ELPA can be found in the ELPA release 2021.05.001. This version includes extensions of the infrastructure for GPU usage, such that AMD GPUs are now fully supported, and an initial (experimental) support for Intel GPUs has been added. The hybrid usage of MPI and OpenMP has also been improved: ELPA now can automatically detect which level of thread support (such as “MPI_THREAD_SERIALIZED” or “MPI_THREAD_MULTIPLE”) is available in the MPI library used, and ELPA adapts the OpenMP parallelisation accordingly. The ELPA library is publicly available as open-source software and can be downloaded from the ELPA git repository hosted by the MPCDF. A new release 2021.11.001 of ELPA is currently being prepared and the new version will be available on the MPCDF systems within the next days. Among others, the new release will feature imporved support for Nvidia A100 GPUs, the option to use non-blocking MPI collectives, and a faster implementation of the autotuning.
Andreas Marek, Hermann Lederer
Using Python-based hybrid-parallel codes on HPC systems
NumPy and SciPy are arguably the most important base packages when it comes to scientific computing with Python. Most Python-based packages in HPC and in HPDA/AI use them, and in doing so leverage the high-performance and implicit thread parallelization these packages provide. Typically, NumPy is linked to a highly optimized math library such as Intel MKL which automatically parallelizes using threads.
Care has to be taken when additional process-based layers of parallelism are employed on top. Python’s ‘multiprocessing’ and ‘mpi4py’ are to be named in this context, and moreover high-level parallelization frameworks such as ‘dask’ or ‘ray’. In each case, processes are spawned by such packages to distribute and parallelize work. It is crucial to limit the number of threads used by each of these processes in order to avoid overloading of the compute resources. In many cases, on each process the NumPy-internal threading would just use the total number of cores logically available on the system, independently of the other processes running on the same system.
To give a simple example for the Raven system with 72 cores per node, a multiprocessing-based code with 72 worker processes would use several thousand threads in total if each worker internally used NumPy naively, leading to very bad overall performance and to potential harm to the stability of the compute node. Obviously, in this example each worker process would need to cap the number of threads to 1.
To limit the number of threads NumPy and similar threaded packages are using, set
the influential environment variables accordingly in your job scripts before
launching the Python code. Such variables are for example
OMP_NUM_THREADS, MKL_NUM_THREADS, NUMEXPR_NUM_THREADS, and
NUMBA_NUM_THREADS.
Some packages support function calls to set the number of threads.
For more details, please consult the documentation of the packages you’re using.
Example scripts for important use cases are given in the user guides for the HPC systems, e.g. for
Raven.
Similar to the Python cases for which such issues have been seen many times on
the HPC systems recently, the same argument applies to Julia-based codes and in
general to any hybrid code including the canonical MPI+OpenMP setup.
Klaus Reuter
Python bindings for C++ using pybind11 and scikit-build
With the rising popularity of the Python programming language it has become increasingly important for computational scientists to be able to make their software easily available to the Python ecosystem and community. Historically, exposing compiled extensions from C/C++ to Python has often been cumbersome, error prone and technically challenging, given the plethora of compilers, libraries and relevant target platforms developers have to deal with. The present article introduces a combination of two Python packages that promise to make this daunting task much easier and more stable. First, the pybind11 header-only library provides a convenient approach to generate Python bindings for existing or newly developed C++ code. Second, the scikit-build package can be used to bridge Python’s setuptools with CMake, leveraging the power of CMake for the build process of the Python extension. As a result, CMake’s native features such as discovering and linking of numerical libraries, dependency management, support of various build-generators, or even cross-compilation can easily be taken advantage of during the build process of the Python extension. A key advantage is that the file ‘setup.py’ stays minimal and simple, instead the aforementioned complexities are handled by CMake.
The basic usage of pybind11 in combination with scikit-build is demonstrated below by means of a simple Python extension package. The code example can be obtained from the MPCDF GitLab.
Interfacing Python/NumPy with C++ using pybind11
pybind11 is a header-only library that provides conversion from C/C++ types to Python, and vice versa. The following C++ Python extension module demonstrates its use in combination with NumPy arrays.
// Python example module 'cumsum'
#include <numeric>
#include <functional>
#include <pybind11/pybind11.h>
#include <pybind11/numpy.h>

namespace py = pybind11;

// numpy-like cumulative sum, taking a NumPy
// array as input and returning a NumPy array
py::array_t<double> cumsum(py::array_t<double> a)
{
    // obtain information about the n-d
    // input array
    auto shape = a.request().shape;
    size_t count = std::accumulate(shape.begin(),
    shape.end(), 1, std::multiplies<size_t>());
    // create output array
    py::array_t<double> b(count);
    // obtain raw pointers
    double * a_p = (double*) a.request().ptr;
    double * b_p = (double*) b.request().ptr;
    // compute cumulative sum into b
    double cs = 0.0;
    for (size_t i = 0; i<count; ++i) {
        cs += a_p[i];
        b_p[i] = cs;
    }
    return b;
}

PYBIND11_MODULE(_cumsum, m) {
    // module docstring
    m.doc() = "pybind11 cumulative sum example";
    // function definition
    // third parameter is the function docstring
    m.def("cumsum", &cumsum,
          "return cumulative sum of array");
}
The example C++ code implements a simple cumulative sum computation similar to the one provided by NumPy. The binary Python module is labeled ‘_cumsum’ which we wrap into ‘cumsum’ (not shown here, cf. the GitLab repository). Our ‘cumsum’ example module can finally be used and tested as follows:
import numpy as np
import cumsum
a = np.random.rand(20)
b = cumsum.cumsum(a)
c = np.cumsum(a)
assert(np.allclose(b, c))
In order for this example to be compiled, the pybind11 headers (as any other potential dependency) must be available. pybind11 can be installed in several ways, and it natively supports various build systems. However using scikit-build provides a particularly easy approach which is shown in the following.
Build with scikit-build
The package scikit-build provides a drop-in replacement for the setuptools.setup function that can be used in a project’s ‘setup.py’ via
from skbuild import setup
Beside the standard setuptools options, it provides extra options to control the CMake build. In addition, a minimal ‘CMakeLists.txt’ file must be available in the top-level directory of the project, e.g.:
cmake_minimum_required(VERSION 3.18)
project(pybind11-hello-world VERSION "1.0")
find_package(pybind11)

pybind11_add_module(_cumsum MODULE
                    src/cumsum/cumsum.cpp)
install(TARGETS _cumsum DESTINATION .)
Build-system dependencies have to be specified via the project’s ‘pyproject.toml’ file:
[build-system]
requires = [
    "setuptools>=42",
    "wheel",
    "pybind11[global]>=2.6.0",
    "cmake>=3.18",
    "scikit-build",
]
build-backend = "setuptools.build_meta"
Now the Python module can be compiled and installed by running the command pip install --user . in the root directory of the project. Similarly Wheel archives can be created for distribution.
Note that with modern Python packaging tools it is not necessary to manually install pybind11 and scikit-build, instead all build dependencies will be installed into an isolated build environment by pip.
The ‘[global]’ feature of the pybind11 requirement is necessary to install the include and cmake files correctly into the dedicated build environment, it does not affect the Python installation or environment in use and can thus be used safely.
Sebastian Kehl, Klaus Reuter
The Gitlab Package Registry
Ready-to-use applications or libraries are often published via package portals. Nearly every programming ecosystem has such a common and widely used web portal: for example, the “Python Package Index (PyPi)” in the Python world, “Maven Central” for Java. With the GitLab Package Registry, you can now publish application packages in various formats directly via the MPCDF GitLab instance.
The GitLab Package Registry was introduced to the open-source variant of GitLab in version 13.3. The Package Registry can be used by any GitLab user to publish packages in various formats. In contrast to publicly available package management portals, GitLab’s Package Registry allows the user to keep a package completely private or share it just with the other members of the current repository or group. In addition, GitLab’s Continous Integration capabilities are a convenient way of building and testing a package automatically from source code stored in a GitLab repository. The Package Registry should not be confused with GitLab’s Container Registry, which can be used to store and distribute Docker images, but not application packages.
GitLab’s Package Registry supports currently a wide variety of package formats, including Maven (for Java/JDK based applications), npm (JavaScript) and PyPi (Python). Further package formats are under development and some are still in beta or alpha status, you can find the whole list of supported package formats in the GitLab documentation.
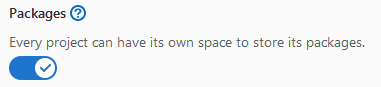
If you want to use the package registry in your GitLab repository, you need to enable it under “Settings / General / Visibility, project features, permissions / Packages”:
After activation, you can access the package registry under “Packages & Registries / Package Registry” in the left menu.
The concrete procedure how to build and upload a package to the package registry depends on the format of the package. The GitLab documentation has examples for the most common package formats.
Example: Publishing Python packages
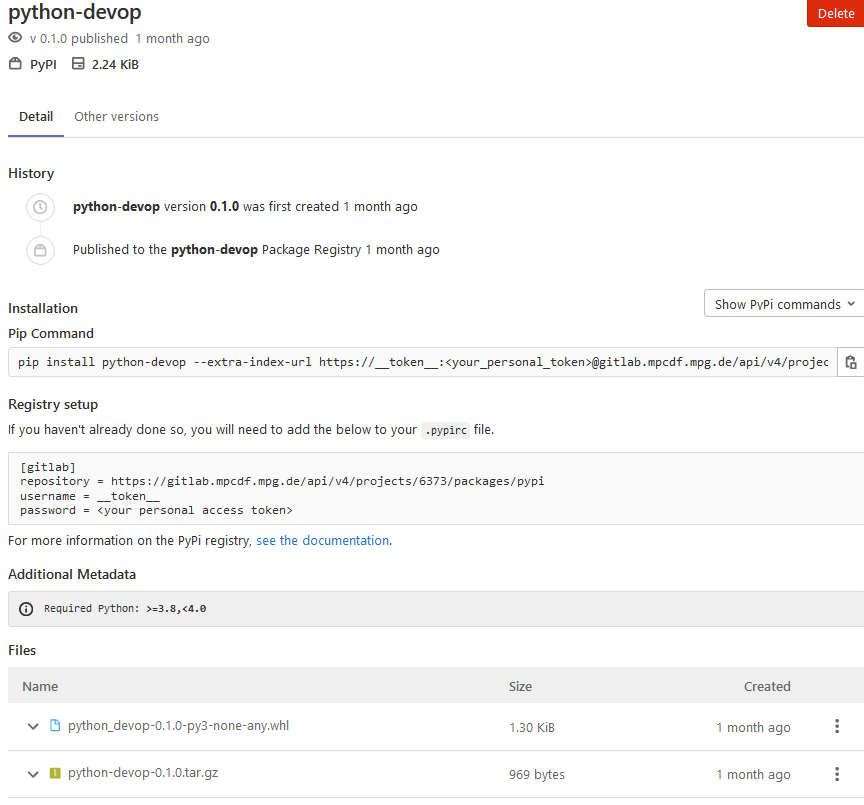
For building and publishing Python packages, you can find a detailed tutorial in the MPCDF documentation: Poetry and GitLab: Devops for Python developers. The tutorial makes use of Poetry, a packaging and dependency management tool for Python. It was already introduced in the previous edition of Bits&Bytes (Poetry: Packaging and Dependency Management for Python). Testing, creation and uploading a PyPi package is done via GitLab’s Continous Integration pipelines. After you have successfully created and uploaded a PyPi Package to the package registry, GitLab shows the package details and how a user can download and install it into his local Python environment:
Thomas Zastrow
Using Application Tokens instead of Passwords
The MPCDF offers several services which can be used on a wide variety of (electronic) devices. For example, the DataShare client can be installed on any smartphone, tablet or laptop: the client makes uploading and downloading files from or to your device easy and convenient. But using these kind of services on mobile devices has a disadvantage: if you don’t want to type it every time, you need to save your MPCDF password on the mobile device. And even if the client stores the password encrypted, if you loose your device or someone steals it, your password may be in the wild. Another, but similar use case are server based applications which need to access services like DataShare or GitLab. If such an application should run automatically and unsupervised, your personal MPCDF password needs to be made available to it.
In order to avoid such security issues, services like DataShare and GitLab are offering application specific tokens (sometimes also called device tokens). These tokens are additional credentials which can be created by the user himself – no help from a service administrator is necessary. Every device can get its own application token: if your laptop got stolen, you just need to delete its application tokens and go on with all other devices and MPCDF services without any change.
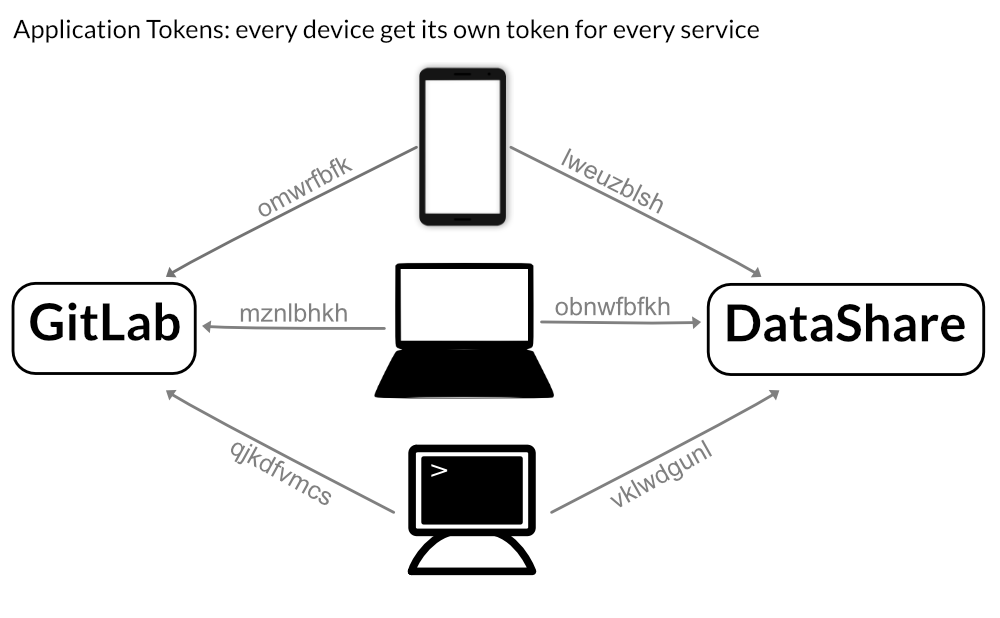
Its strongly recommended that you create for every device its own token!
To clarify: unless your hard disk is encrypted, a potential thief still has access to the data locally stored on the device. But he can’t access the application itself anymore and update, change or delete data on the server. The following sections describe the procedure of creating application tokens in DataShare and Gitlab.
DataShare
After logging in to DataShare, go to your account settings (top right of the screen). In the menu on the left, there is an entry “Security”. On the bottom of this page, you can find the option “App passwords / tokens”. Enter a name for your device into the text box and click “Create new app passcode”:

DataShare will now create a secure and safe token for you - make sure that you copy and paste it! DataShare will never be able to show you the token again. If you forgot to save the token, you need to delete the entry for the device and create a new app token. In any DataShare client, you can now use the app token in combination with your MPCDF user name to log in.
GitLab
In GitLab, you can find the application tokens under your personal account, “Access tokens”:
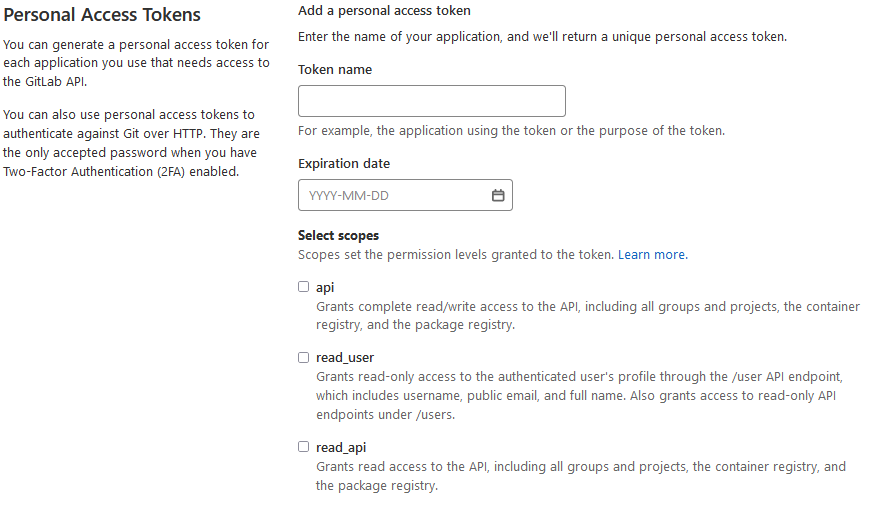
In contrast to DataShare’s App Tokens, GitLab’s Access Tokens have more functionality. Every token can have an expiration date and one or more scopes. Via scopes, you can set the token permissions to GitLab in a fine-granular way.
Thomas Zastrow
Software Publishing
Software written in the context of research receives more and more attention and is increasingly considered as genuine research output that is publishable in its own right. In this article we outline three ways of publishing software, thereby making it referenceable and citable.
Do it yourself
In order to make software citable one needs at a minimum an identifier such as a digital object identifier (DOI) pointing to a place on the web from where the software can be obtained. The latter can be any website of your choosing or just a tagged revision of your code in a publicly accessible version control system such as MPCDF’s Gitlab. Being affiliated with the MPG you can request a DOI from the Max Planck Digital Library (MPDL) through their DOI service. You fill in the form and thereby specify the URL of your code plus some basic metadata and that’s it.
Publish via a data archiving site
In many cases, however, you want a copy of your code to be available from a 3rd-party data repository thereby delegating the responsibility for the long-term preservation of your code. You also often want to publish multiple versions of your code over time and you want to be able to refer to individual revisions as well as your coding project in general and expect that the metadata associated with the identifiers reflect these relationships.
An example of how this can be achieved is Github in concert with Zenodo as explained on Github. While there is no such tight integration of Zenodo with Gitlab you can achieve essentially the same by setting up your own code publication pipeline using, for example, gitlab2zenodo.
Software Heritage
A further option to archive and publish your code is via Software Heritage. Software Heritage maintains an infrastructure and services that will crawl your public code repository (no matter whether it is based on git, subversion, or any other common revision control system) on a regular basis once you have prepared your code repository and registered it as explained on their website. They will store a copy of your code, preserve it and assign a unique intrinsic identifier which can then be used much in the same way as a DOI.
Final remarks
No matter which way you publish your code it is a recommended best practice to also make the repository of the (to-be) published code publicly accessible. Some of the approaches mentioned above even require that. In all cases you are expected to add metadata including authorship and usage rights (aka a license). And as a general recommendation: a license should be chosen under all circumstance and it is advisable to do this as early as possible. If in doubt ask your peers or seek advice, e.g., on websites such as “Choose a license”.
Raphael Ritz
News & Events
International HPC Summer School 2022
The international HPC summer school (IHPCSS) 2022 is planned as an in-person event from June 19th to June 24th in Athens, Greece. The series of these annual events started 2010 in Sicily, Italy. Due to the Covid-19 pandemic, IHPCSS 2020 had to be cancelled and was carried out as a virtual event in 2021, with mirrored sessions in two different time zones to allow for convenient participation from any part of the world.
Now for 2022, the organizing partners XSEDE for the US, PRACE for Europe, RIKEN CCS for Japan and the SciNet HPC Consortium for Canada are inviting again for applications for participation in Greece. In case pandemic conditions will not allow to ensure health-safety, the organizers will switch to a virtual event. A final decision is expected by March 2022. Eligible candidates for applications are graduate students and postdoctoral scholars from institutions in Canada, Europe, Japan and the United States. Interested students are invited to apply by the end of January 2022. School fees, meals and housing will be covered for all accepted applicants. 30 seats out of the total number of 80 are reserved for applicants from European institutions, and 50 seats are given to students from the US, Canada and Japan. Traditionally, students from Max Planck Institutes were participating. For further information and application, please visit the website of the summer school.
Hermann Lederer
Advanced HPC workshop 2021
From November 22nd to 25th, the MPCDF hosted its annual Advanced HPC Workshop for the MPG, as an online event. Around 20 participants listened to 21 lectures given by members of the applications group, the AI group and by experts from Intel and Nvidia. The topics included software carpentry, debugging, profiling and optimizing codes for CPUs and GPUs. The last day was dedicated to five code projects brought in by the participants. Together with the code owners and the experts from Intel and Nvidia, various tools were applied to the codes and optimization strategies were developed. Material of the MPCDF training programs, including semi-annual introductory courses for new users, as well as upcoming events can be found at the MPCDF webpage under “Training & Education”
Tilman Dannert
60 Years Max Planck Computing Centre in Garching
In August 1961 the Institute for Plasmaphysics (IPP) in Garching procured one of the most powerful computers at that time – an IBM 7090 system with a performance of 100 kFlop/s. The IPP had been founded in 1960 by Werner Heisenberg and the Max Planck Society. To the first users besides IPP belonged the Max Planck Institutes for Physics and Astrophysics, for Biochemistry, and both Munich Universities. The German Computing Centre in Darmstadt procured the same system und used the Garching computer in addition in phases of capacity shortage. In 1969 an IBM 360/91 system was installed which also belonged to the world’s top systems. In 1979 the first vector computer worldwide for general basic science was installed at the “Rechenzentrum Garching” (RZG). In the following years and decades the RZG has evolved from a local to a central facility of the Max Planck Society, and in 2015 it was renamed to Max Planck Computing and Data Facility (MPCDF), underlining that it also belongs to the world’s largest academic data centers. More than 50 Max Planck Institutes make use of the services for computing, storage, leading-edge HPC and AI application development, and carry out data management projects in collaboration with MPCDF. In addition, the MPCDF is engaged in many national and international projects.
On October 14th, the 60-year anniversary was celebrated with a scientific symposium in Garching. Vice president of the Max Planck Society, Prof. Blaum, gave a honorific speech, and renowned scientists from Plasma und Astrophysics, Materials and Life Sciences, Quantum Physics and Computer Science inspired the auditorium with brilliant presentations on the state of the art of computer-based basic science. The celebration act was finished with a dinner in the rotating restaurant of the Munich Olympic Tower, enabled by sponsorships of technology partner companies IBM, Lenovo and Nvidia.
Hermann Lederer