Compute
This page expands upon Quick Start by describing the various options in more detail, including image/flavor selection and config scripts. Also covered are two mid-lifecycle operations – rebuild and resize – which change a running server’s image and flavor, respectively. Finally, possible locations for the system disk are detailed, as this is the mechanism by which local SSD storage is provisioned in the HPC Cloud.
Images
A newly-created server’s operating system type and version are determined by the template or image used to create the system (root) disk. The following cloud-ready images are maintained by the admins:
OS |
Machine Type |
Firmware |
Software Mirrors |
Availability |
|---|---|---|---|---|
AlmaLinux 8 |
i440fx |
BIOS |
almalinux.org, local EPEL |
all projects |
AlmaLinux 9 |
q35 |
UEFI |
almalinux.org, local EPEL |
all projects |
CentOS Stream 8 |
i440fx |
BIOS |
local, including EPEL |
all projects |
CentOS Stream 9 |
i440fx |
BIOS |
local, including EPEL |
all projects |
RHEL 8 |
i440fx |
BIOS |
Red Hat via subscription |
on request, license required |
RHEL 9 |
q35 |
UEFI |
Red Hat via subscription |
on request, license required |
Debian 12 |
q35 |
UEFI |
all projects |
|
Ubuntu 20.04 |
i440fx |
BIOS |
local |
all projects |
Ubuntu 22.04 |
i440fx |
BIOS |
local |
all projects |
openSUSE Leap 15.5 |
q35 |
UEFI |
all projects |
|
SLES 15 SP5 |
q35 |
UEFI |
local |
on request, license required |
The default login of the public images is root with publickey being the only enabled authentication method.
Further configuration details can be found in gitlab.
Support for images is limited to the initial deployment of the server. On-going maintenance, including security updates, and application/service configuration remain the responsibility of the project admin(s).
Tip
You may also build and upload your own images in RAW or QCOW2 format. Note that cloud-init or an equivalent service is required to retrieve the hostname, SSH keys, etc. via the metadata service.
Snapshots
A snapshot is an image containing a copy of a server’s system disk at a particular point in time. Snapshots are useful for duplicating a pre-configured server or creating a “restore point” before performing maintenance. Note that there is no single action to “revert” to a previous snapshot, but the same result can be achieved with the rebuild function.
To create a snapshot, click the  button next to the desired source server on Project / Compute / Instances.
If the server is running, it will be paused briefly while the data is copied. 1
button next to the desired source server on Project / Compute / Instances.
If the server is running, it will be paused briefly while the data is copied. 1
CLI example
openstack server image create SERVER --name SNAPSHOT
See Project / Compute / Images for a list of images and snapshots available on the active project.
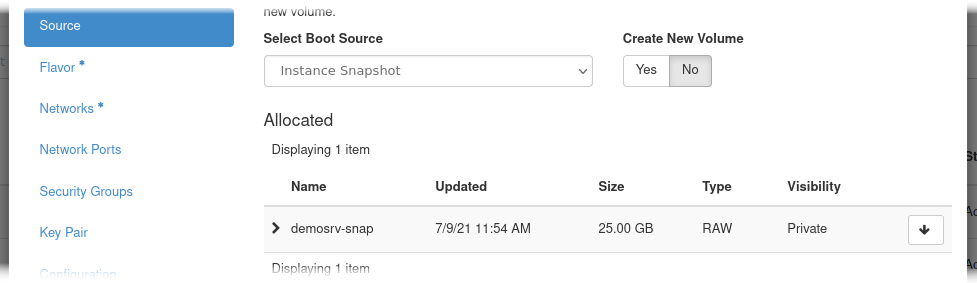
To launch a new server from a snapshot, simply choose Instance Snapshot as the boot source and select the desired snapshot from the list. The resulting instance will be a clone of the source at the time the snapshot was taken, but with different MAC and IP addresses. 2
CLI example
openstack server create NEWSERVER --image SNAPSHOT ...
Rebuild a server
A server can be rebuilt from an image, thereby keeping the same configuration including MAC and IP addresses.
Warning
All data written to the system disk since the initial deployment will be lost during the rebuild!
To rebuild a server, select it from Project / Compute / Instances and then choose the  action.
You can either start over with the same OS by choosing the running image (listed in the “image name” column) or change the OS by picking a different image.
Even if your server is based on a now out-of-date image (identified by the presence of a datestamp YYYYMMDD in the name), you still have the option of rebuilding from the original image.
Note that for technical reasons changing the machine type (pc-i440fx or pc-q35, see table above) by rebuilding is not supported.
If you need to do this, please contact MPCDF for help.
action.
You can either start over with the same OS by choosing the running image (listed in the “image name” column) or change the OS by picking a different image.
Even if your server is based on a now out-of-date image (identified by the presence of a datestamp YYYYMMDD in the name), you still have the option of rebuilding from the original image.
Note that for technical reasons changing the machine type (pc-i440fx or pc-q35, see table above) by rebuilding is not supported.
If you need to do this, please contact MPCDF for help.
Hint
To revert to a previous snapshot, simply rebuild the server from its own snapshot.
CLI example
openstack server rebuild SERVER --image IMAGE
Provide a SNAPSHOT in place of IMAGE to revert to that snapshot, or omit the --image option entirely to use the original image.
Flavors
The flavor assigned to an instance determines its hardware resources including number of CPU cores, amount of memory, and size/location of the system disk. 3 Here is a partial list of pre-defined flavors:
Name |
vCPUs |
Memory |
Disk Size |
Disk Location |
Compute Node |
Availability |
|---|---|---|---|---|---|---|
mpcdf.small |
1 |
2 GB |
25 GB |
Ceph |
shared |
all projects |
mpcdf.medium |
2 |
4 GB |
25 GB |
Ceph |
shared |
all projects |
mpcdf.large |
4 |
8 GB |
25 GB |
Ceph |
shared |
all projects |
mpcdf.xlarge |
8 |
16 GB |
25 GB |
Ceph |
shared |
all projects |
mpcdf.NcMg |
N |
M GB |
25 GB |
Ceph |
shared |
all projects up to 24 vCPUs and 64 GB, larger on request |
mpcdf.NcMg.ssd |
N |
M GB |
250 GB |
local SSD |
shared |
on request |
mpcdf.NcMg.nvme |
N |
M GB |
25 GB |
Ceph |
shared, with NVMe |
on request |
mpcdf.NcMg.gpu.T |
N |
M GB |
25 GB |
Ceph |
shared, with GPU T |
on request |
mpcdf.dedicated.NcMg |
N |
M GB |
25 GB |
Ceph |
dedicated |
on request |
Shared compute nodes allow a limited level of virtual CPU oversubscription. This configuration benefits applications with intermittent load profiles (very common in a cloud environment), by allocating more virtual cores than the total number of physical cores on the host. In this way load peaks can be processed more quickly and idle cores can be utilized by other applictions. On the other hand, continuously-busy applications should run on dedicated nodes to have predicable performance and avoid negatively affecting other projects. In such cases a .dedicated flavor should be employed to ensure that each vCPU is pinned to a physical core.
Users are not allowed to create their own flavors, but additional variations, e.g. more memory-per-core or a specific disk size, are available upon request. A complete list is flavors available to the active project is shown in the “Flavor” section of the launch wizard.
Attached devices
Instances using .gpu. flavors see the usual virtual hardware, plus an Nvidia A30, A40, or A100 GPU attached in PCI-passthrough mode.
The standard “baremetal” driver and software stack may be employed, including nvidia-smi command to query the state of the GPU.
Similarly, instances using .nvme flavors see the usual virtual hardware (including Ceph-based system disk), plus a 1.6 TB NVMe SSD attached in PCI-passthrough mode.
This device will appear as block device /dev/nvme0n1 to be formatted with a filesystem or written directly by an application.
Before deleting an NVMe-enabled instance, please erase the device as this does not happen automatically:
apt install nvme-cli  # or equivalent on other systems
nvme format -s1 /dev/nvme0n1
Caution
The contents of a NVMe SSD could are not automatically cleared between uses. Before deleting an instance with attached NVMe, it is strongly recommended to erase the device as described above, otherwise the data could potentally be read from a different project.
Please be aware that neither attached GPUs nor NVMe SSDs support live migration, meaning that occasional scheduled downtimes will be required for maintenance purposes.
System disk storage location
Flavors not ending in .ssd store the system disk on the Ceph backend, which has certain advantages:
Data is replicated across the Ceph cluster for a high degree of availability.
Instances can be quickly restarted on a different host in the event of a hardware failure.
In contrast, .ssd flavors will place the system disk directly on the local SSD-based storage of the compute host, which may offer higher I/O performance. 4
Caution
Locally-stored system disks may become unavailable or even permanently lost in the event of a hardware failure.
Resize a server
The resources of a running server may be resized up or down by changing its flavor – a semi-automated process during which the server is stopped, a temporary snapshot is taken, and then provisionally restarted. This provides the opportunity to revert the change in case the operating system proves to be incompatible with the new flavor. You may pick any new flavor provided the system disk location remains the same.
Danger
Changing the system disk storage location is not supported and will result in data loss!
Select the server from Project / Compute / Instances and then choose the
 action.
Wait while the server gracefully shuts down, a snapshot is made of its system disk, and it restarts using the new flavor. 5
Login to the server and check if the operating system and services are running normally. If so, click the
 button, otherwise choose
  to undo the operation.
CLI example
openstack server resize SERVER --flavor NEWFLAVOR
ssh -i KEYFILE root@10.186.XX.XX systemctl status
openstack server resize confirm SERVER
If SSH login fails or systemd reports problems, use revert in place of confirm on the last line.
Customization script
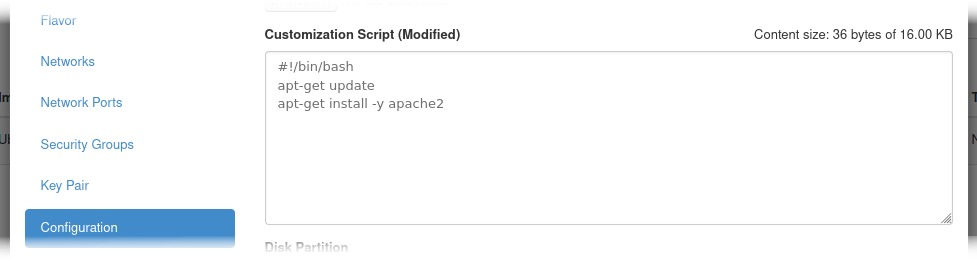
Server deployment can be further automated via customization scripts (also called user data).
The two most common formats are scripts, which are called by cloud-init during startup, and cloud config files, which modify the behavior of cloud-init itself.
The formats are distinguished by the presence of #! or #cloud-config, respectively, on the first line of the script.
To use a customization script simply paste its contents into the text box in the “Configuration” section of the launch wizard.
Hint
Adapt the following example block to automatically deploy a second SSH key in addition to your personal key pair.
#cloud-config
ssh_authorized_keys:
- ssh-rsa ...
CLI example
openstack server create SERVER --user-data SCRIPTFILE ...
- 1
Consistency of snapshots is only guaranteed at the block level, i.e. pending operations at the file level may not be captured. Normally this is not a problem for modern filesystems, databases, etc.
- 2
Note that unique identifiers such as
/etc/machine-idwill be carried over from the original. In some operating systems this includes SSH host keys as well. If this is not the desired outcome, regenerate them with, e.g.:ssh-keygen -f /etc/ssh/ssh_host_rsa_key -t rsa -N ""- 3
Note that the HPC Cloud does not offer ephemeral disks. To add additional disks see block storage.
- 4
This option has no effect on boot-from-volume instances, for which the storage location is determined by the volume type.
- 5
Additional volumes are not included in the automatic snapshot, so any data written to these disks during the provisional restart will remain in place, even if the resize is reverted.