Data Transfer: Tools & Tips
Tools and tips for transferring data to and from MPCDF
Several options exist to enable data transfer to and from MPCDF. Here we outline the main tools which are in general use for data transfers at MPCDF.
Since each data transfer case is different we will break the tools down into three categories:
Large scale data transfers
Small/Medium scale data transfers
Sharing of small datasets (files)
The purpose of the page is not to set in stone which tools should be used when, but rather to provide advice based on our experience. In some cases there is overlap in the use-cases which each tool is useful for. As you start to transfer data to/from MPCDF it is worth gaining some experience of each tool type before you settle on a specific tool.
In addition to describing the data transfer tools we will also introduce the screen tool which can be used to help keep long running transfer processes going even when a users needs to log out of a session.
Large Scale Data Transfers
For large scale data transfers (often in the multi TB range) the MPCDF has made good experience using the bbcp and globus-online tools.
Globus Online
Globus Online (Globus.org) is a free service which allows users to move large volumes of data in simple and reliable manner.In general Globus Online requires sites to set up a Globus Connect Server for data transfers, however, individual users can also install a Personal Client to enable them to move data to/from Globus servers.
The Globus Online web portal provides a user friendly interface that enables users to transfer data between Globus Online servers. Many research centers have existing Globus Online servers which can be found via the web portal. Data transfers can be scheduled via the web portal and the Globus service will move the data reliably and transparently in the background.
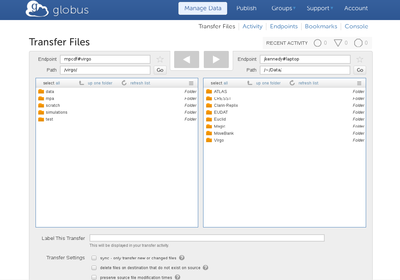
Below is a screenshot of the Globus Online portal enabling data transfers.
The left hand pane is a session connected to a Globus Connect Server, the right is a session connected to a Globus Connect Personal Client on a laptop.
Data can be move between these two endpoints by simply highlighting it and clicking on the transfer arrow.
Globus enables, fast and reliable multi-stream data transfers, data syncing, checksum verification, encrypted transfers and more.
The Globu Collection “MPCDF DataHub Stage-and-Share Area” can be used for staging data to and from MPCDF as well as Sharing data with other Globus Users. All MPCDF users have access to DataHub and in cases where a project does not have a dedicated globus endpoint the datahub should be used as a default.
The MPCDF can aid with the deployment of Globus Online Servers for specific projects and Globus Online Personal Clients for individual users, including providing membership to Globus Connect Personal Plus. This means that a Globus Online solution can be found on a project and/or user level - enabling data to be transferred between external sites and MPCDF.
For more information see: https://www.globus.org/#transfer
bbcp
As the bbcp tool is no longer under active development, it is only available for legacy reasons. We recommend to use Globus Online or another tool mentioned in this section.
bbcp is a point-to-point network file copy application written by Andy Hanushevsky at SLAC as a tool for the BaBar collaboration. It is capable of transferring files at approaching line speeds in the WAN.
bbcp is made available on MPCDF clusters via the modules environment.
To enable bbcp:
module load bbcp
bbcp --help
bbcp is a peer-to-peer application. No server process is required - you just invoke bbcp on a source machine and in response a bbcp process is started on the target machine. You can also do this as a third party: the source and target machines do not need to be the same machine that you initiate the file transfer from.
Note: this means that you need bbcp to be installed on both source and target machines and to have ssh login access on each machine.
Among other features bbcp supports multiple streams, checksums, recursive copies, resumption of failed transfers, reverse connections and data compression.
All of these features are explained in depth in the online docs listed below.
A simple example follows:
bbcp -P 10 -w 2M -s 10 test_10G_file user@remotehost.no.de:/userdata
This would cause bbcp to transfer a testfile (test_10G_file) to a remote location remotehost.no.de (where the remote username is user).
The transfer would use 10 parallel streams (-S 10) with a TCP window side of 2MB (-w 2M)and report progress every 10 seconds (-P 10).
In general some experimentation with the number of streams and window sizes may lead to better transfer rates, however in most cases the default behavior to use window auto-tuning is more than sufficient.
More information about bbcp can be found here:
Transferring small/medium data sets
For transfers of smaller datasets, in the GBs range, tools such as rsync and scp and sftp are perfectly suitable. These tools can be used for transferring datasets to and from ssh enabled servers.
The main benefits of these tools are that they are widely available, well known and relatively simple to use.
The drawback is performance, they will simply not achieve the out-of-the-box data transfer rates that bbcp and globus online will.
The rsync tool is a natural fit when syncing data and can improve data transfer speeds by simply avoiding transferring data that has not changed.
Many systems at MPCDF allow outbound connections and thus command line tools can be used to start data transfers from these systems to external servers.
In cases where a connection is required from an external system to an MPCDF system/linux-cluster users can make use of ssh tunnels via the gate1.mpcdf.mpg.de or gate2.mpcdf.mpg.de nodes. This is especially useful for SFTP.
From an external system (e.g. laptop/desktop) create an ssh tunnel, in this example to a raven login node, but other MPCDF cluster login nodes will work similarly:
ssh <user>@gate1.mpcdf.mpg.de -L 2002:raven.mpcdf.mpg.de:22 -N
Once this tunnel has been established SFTP can be used to access the login node as it if were on your local system (in this case point your sftp client to port 2002 on localhost). This means that you can use file transfer tools such as FileZilla by just setting up the tunnel and configuring the FileZilla remote SFTP connection to use localhost and port 2002.When using FileZilla the 2FA may cause some problems (login requests can occur on each file transfer). To overcome this change the Login Type to interactive and set the Max number of connection to 1 in the Site Manager configuration.
Note that for windows systems WinSCP is also capable of using the gate node as a proxy. Simply configure WinSCP to use an ssh tunnel in the Advanced Options section using gate1.mpcdf.mpg.de as the hostname and your usual MPCDF user name and password.
To simplify direct access from Linux-based systems the ssh ProxyJump option can be used.
To access the archive (or any cluster login node)
sftp -o 'ProxyJump <user>@gate1.mpcdf.mpg.de' <user>@archive.mpcdf.mpg.de:
on newer OpenSSH versions (7.3 and above) you can use the -J option directly:
sftp -J <user>@gate1.mpcdf.mpg.de <user>@archive.mpcdf.mpg.de:
Note: This will also work for ssh connections and rsync via ssh
ssh -J <user>@gate1.mpcdf.mpg.de <user>@raven.mpcdf.mpg.de

rsync -av -e 'ssh -J <user>@gate1.mpcdf.mpg.de' source-dir <user>@archive.mpcdf.mpg.de:
For more information see the scp, sftp and rsync man pages and/or search the internet (many tutorials and tips exist).
Note: rsync, sftp and scp can also be used for transferring larger data volumes, you may need to monitor the transfers over a larger timeframe though (or write wrapper tools to parallelize their usage).
Exposing data via MPCDF DataShare
The MPCDF DataShare service provides MPCDF users with a web based sync and share service.
This service allows users to upload and share data with external collaborators, or to simply upload it for later download from an external site (or home PC/laptop/tablet). This makes the Datashare service a perfect fit for exposing and sharing smaller datasets, or single files (documents).
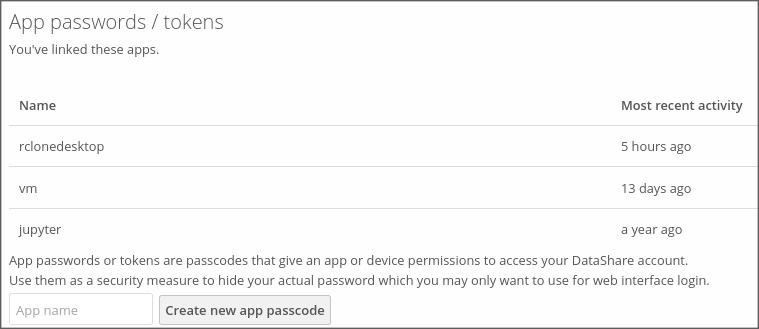
To avoid storing your central MPCDF username and password in scripts or apps, DataShare offers the possibility to create so called device passwords. These device passwords are additional credentials for your regular DataShare account. You can create as many as you need and use these credentials instead of your regular account within your apps or scripts to access DataShare. Once there is a security issue on one of your devices (lost smartphone, hacked account etc.), only the app password is effected and not your MPCDF account. Therefor, we strongly recommend using DataShare device paswords wherever it is possible.
To create a new device password, log in to DataShare. In the top right corner, click on your user name and open “Settings”. In the menu on the left, go to “Security” and scroll down to “Devices & Sessions”. Here, you can create new app passwords for every device you are using DataShare on. In the text field, enter the name of the app for which you want to create an app password for.
DataShare will show you the automatically generated password only once, so make sure to copy and save it somewhere else!
Now, your app can access DataShare with the combination of your username and the new created app password.
RClone
Rclone is a command line program to manage files on remote/cloud storage.
Rclone has a rich set of features and supports over 40 cloud storage systems including Nextcloud (Datashare), OpenStack Swift, as well as standard transfer protocols (HTTP, SFTP, FTP) and local filesystem. Rclone’s ability to connect to many different storage services makes it a real swiss army knife when it comes to moving and managing data. It is a very valuable tool for modern day researchers who’s data is often located in several different data silos.
Within Rclone each storage resource is configured as a remote.
Calling rclone config from the command line will open an interactive configuration session:
rclone config
e) Edit existing remote
n) New remote
d) Delete remote
r) Rename remote
c) Copy remote
s) Set configuration password
q) Quit config
e/n/d/r/c/s/q>
Witihin this session, remotes can be added and/or altered.
Alternative you can call rclone config with a specific configuration option directly. (see the note below regarding secure configurations).
Once remotes are configured they may be accessed to list content
$ rclone ls remote:path
Data may be copied or moved between remote storage resources as follows
$ rclone copy source:sourcepath dest:destpath
$ rclone move source:sourcepath dest:destpath
The actualy data transfer runs through the rclone client.
Additionally Rclone allows for data syncing (similar to rsync)
$ rclone sync source:path dest:path
This will sync the source to the destination, changing the destination only. Unchanged files will not be transfered and files at the destination may be deleted. Since this can cause data loss, always test first with the –dry-run flag to see exactly what would be copied and deleted.
Note: Be advised that rclone sync acts differently to rsync w.r.t. the creation of target dirs, rclone will not auto-create dirs on the target
For instance: never do rclone sync somedir datashare:
This will delete all the data in datashare - replacing it with the data in somedir. (using –dry-run will help avoid such problems)
To use local storage simply ommit the remote prefix and use the data path as usual.
Several remotes can be configured (using different protocols) , alowing you to easily move data between services. The example below shows remotes configured to connect to aws-s3, the MPCDF DataHub and Datashare services and an openstack swift instance.
    Current remotes:

    Name                 Type
    ====                 ====
    aws                  s3
    datahub              sftp
    datashare            webdav
    openstack            swift
Once this configuragtion is setup data can be easily moved between Datashare, Datahub and local storage as well as any cloud based storage (in this case swift and s3). Rclone is a Go program can be installed as a single binary file. For more information and to download Rclone please see the official Rclone website: https://rclone.org/
Notes: Safe Configurations. When a remote is configured in Rclone the remote password is saved, in obscured mode, in the rclone configuration file. To secure the passwords you can create a password for the rclone configuration itself. When Rclone config is called from the command line, you will see several options. If you select “s” you can set a configuration password (see below).
$ rclone config

s) Set configuration password

e/n/d/r/c/s/q> s
Your configuration is not encrypted.
If you add a password, you will protect your login information to cloud services.
a) Add Password
q) Quit to main menu
Once a secure configuation file has been created you will need to provide a password each time you start an rclone session.
ALWAYS create a secure configuration file.
The screen command
Although not a data transfer command, the screen command can be very useful when transferring large datasets. The screen command is a window manager that allows user sessions to continue even after a user has logged out.
Long running data transfers can often take many hours or days, wrapping a session with screen means that a user can logout and re-connect to the session later, picking up from where they left off:
Type
screenUse the session as usual (starting a data transfer etc)
Detach from session using
CTRL-a dThen view existing sessions
screen -lsTo re-connect to a session
screen -r <session.id>
Don’t forget to kill the session when finished “CTRL-a k” for a single window, or “CTRL-a \” for a multi-window session.
See the screen man page for more information or search on the internet (many tutorials exist).
Support:
As always MPCDF support is available to answer questions - please submit a helpdesk ticket in cases where you feel support and/or advice is needed when transferring data.
Some general notes:
When moving large datasets tools like tar and zip are your friend. If you have a large number of small files to transfer across a network link then real performance gains can be found from forming compound archives from these files and compressing them. Transferring big chunks of compressed data is a good idea. Also using formats such as the BagIt format can help to ensure that the data payload is correctly described and that checksums of the data files exists. So when considering data transfers it is good to start by looking at your data and it’s format and asking if you can/should transform the data before transferring it.
And finally a small note of caution: When transferring datasets over a wide area network (between data centers) a certain amount of fluctuation can be expected in the transfer rates. The networks are shared with many users and the storage system at both the source and sink are often shared.