Visualization
Support for the Visualization of Scientific Data
The application support group at the MPCDF supports Max Planck scientists in producing high quality scientific visualizations.
Remote Visualization and Jupyter Notebook Services
Web-based services are available on RAVEN and ROBIN for all the users with an account on the clusters that want to access CPU and GPU resources for visualization, development, computation and analysis of results on HPC systems. The Remote Visualization Service (RVS) and Jupyter Notebook as a Service (JNAAS) provide the following sessions:
Remote desktop: suitable for efficient use of GUI tools (e.g. VTUNE, Matlab) and for activities that do not require intensive calculations. Resources on RAVEN: 8 CPU cores, up to 256 GB of (shared) main memory.
Remote visualization: suitable for GPU-accelerated calculations and rendering using tools like VisIt or Paraview. Resources on RAVEN: a single A100 GPU, 18 cores and up to 512 GB of (shared) main memory.
Jupyter: suitable for standard data analysis and computation using Jupyter notebooks. Resources on RAVEN: 8 CPU cores, up to 256 GB of (shared) main memory.
Jupyter for machine learning: suitable for GPU-accelerated machine-learning applications using Jupyter notebooks. Resources on RAVEN: a single A100 GPU, 18 cores and up to 512 GB of (shared) main memory.
RStudio: launch RStudio, an IDE for R. Only available on ROBIN, with 12 CPU cores and 64 GB of main memory. For technical reasons, an Ubuntu-based container (”rocker”) is used to run RStudio. Make sure to enter your actual MPCDF username in combination with your RVS password (set up at initialization, see below) when prompted at login.
Each remote graphical session (desktop and visualization) has a maximum run time of 24 hours, while Jupyter sessions are allowed to run for up to 8 hours. All sessions have access to the software provided via the module environment, including visualization software (e.g., VisIt, ParaView, Blender, ImageMagick, ffmpeg) and software for Data Analytics, and the data stored on the HPC systems.
Web Interface
To start using the Remote Visualization and Jupyter Notebook services, users can login to https://rvs.mpcdf.mpg.de with their Kerberos user name and password, using a web browser that supports HTML5 (we recommend to use Mozilla Firefox or a Chrome-based browser). Please, also note that the service doesn’t currently support zsh shell on the compute clusters (i.e. if your account on Raven is using zsh shell, you will likely have problems initializing and submitting new RVS sessions, see the Troubleshooting section below).
Three options are available:
Initialize Remote Visualization:

This step is only required the first time a user wants to access the RVS and JNAAS on a specific HPC system. Using the web form, the user can set the VNC and Jupyter password which is required to connect to running sessions (both remote visualization and Jupyter) later. We encourage users to select a password different from their Kerberos’ one and with a minimum of 8 characters, following common password policies. Note that the VNC and Jupyter password is used only for connections to the VNC and Jupyter servers and does not replace in any way your Kerberos password. For example, you still need your Kerberos credentials to authenticate to https://rvs.mpcdf.mpg.de before being able to connect to your running sessions with your VNC and Jupyter password. Important: users that initialized the RVS prior to April 2020 should re-initialize their password in order to also set a Jupyter password.
In the section Default modules for JN session the user can specify the name of any module that should be loaded before starting all the Jupyter notebook sessions. This list is stored in a file located in the home folder of the user ($HOME/.jupyter/modules.conf). For example, in order to have some machine learning modules pre-loaded to each Jupyter notebook session, a user can write:
gcc/6
cuda/10.1
cudnn/7.6.2
nccl/2.4.8
impi/2019.4
tensorflow/gpu/2.1.0
in the text box to have the respective modules immediately available at the start of each session. Note that the “rvs” and “Anaconda/3” modules are loaded by default and additional modules can be loaded from a running Jupyter notebook, if needed (see the Troubleshooting section). Use this option only if instructed by MPCDF staff. The initialization step also creates a symbolic link called “ptmp_link” in the home of the user to easily access the /ptmp volume and a folder called “rvs” in the home of the user, where logs of the remote visualization and Jupyter sessions will be stored.
Submit new session:
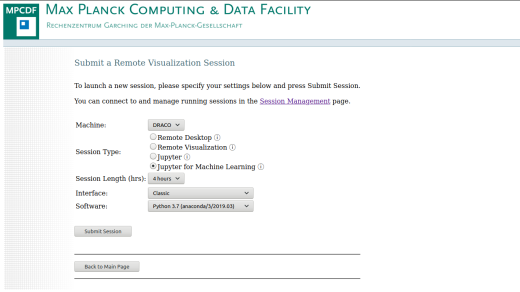
This page provides the form to request a remote desktop, remote visualization or Jupyter notebook session on the HPC system. Note that some types of sessions are not available on all clusters (for example, the Remote desktop is currently available only on the RAVEN cluster). Depending on the Machine and on the selected Session Type, different resources are available for each session (see above). The information icon next to the session type reminds of the exact resources allocated to each session. In this page, users can specify parameters of the session such as the length (default 4 hours) and, depending on the Session Type, the screen Resolution of the remote session (for Remote desktop and Remote visualization sessions) or the Interface and Software (for Jupyter and Jupyter for machine learning). Two values for the Interface are available: a Classic interface for standard Jupyter sessions and a Lab interface for users that prefer the Jupyter Lab layout. In the Software menu, it is possible to specify if the Anaconda3 package used for the Jupyter sessions should be based on Python only or should include the R language. Once the form has been confirmed, the job is automatically submitted to the batch queue on the HPC system, and a notification e-mail is sent to the user as soon as the session is ready.
Connect to session:
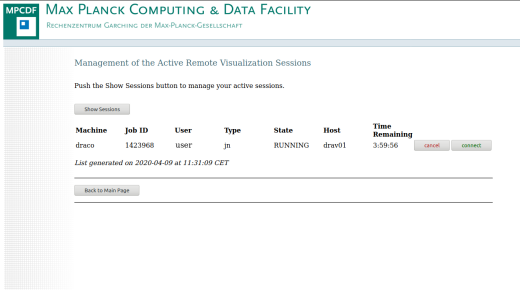
This page provides information about the status of the submitted sessions, including the possibility to cancel a session or connect to a running one. All sessions are opened in a new browser tab. The VNC and Jupyter password that has been specified in step one has to be entered to finally give the user access to the remote session directly from the web browser.
Command line interface
Users that prefer to use a command line interface can manually initialize and request remote visualization and Jupyter sessions by submitting jobs to the batch system on the HPC clusters. The initial setup needs to be performed by the user only once on each cluster as follows:
$ module load rvs
$ module load anaconda/3/2020.02
$ setup_rvs
$ setup_jn
This will create a password for the VNC and Jupyter connections, the folders “$HOME/rvs” (where logs will be stored) and “$HOME/.jupyter” (for the Jupyter configuration files) in the home directory of the user, with an automatic backup of previously existing folders with the same name. In addition, a symbolic link to the /ptmp volume named “ptmp_link” is created in the home of the user. For example, to start a 4-hour long interactive visualization session, the user can then simply run the following commands:
$ module load rvs
$ cd $HOME/rvs
$ sbatch --time=04:00:00 $RVS_HOME/bin/rvs.cmd
Similarly, to start a 4-hour long interactive Jupyter session, the user can run the following commands:
$ module load rvs
$ cd $HOME/rvs
$ sbatch --time=04:00:00 $RVS_HOME/bin/jn.cmd
As soon as the session starts, the user will receive a notification e-mail with instructions on how to connect via a URL, via the new web interface, or via a conventional VNC software client (for remote desktop and remote visualization sessions).
Please, note that only the MPCDF authorized scripts can run on the RVS and JNAAS partitions: scripts modified by the users will result in an immediate failure of the job.
Technical details
The web-based Remote Visualization Service at MPCDF is based on a combination of Virtual Network Computing (VNC) and WebSocket technologies.
VNC provides a method to access a virtual graphical desktop on the HPC systems via the Remote Frame Buffer protocol, thus efficiently transmitting a stream of images between the server and the client. Access to the GPU hardware accelerated graphics is provided via VirtualGL.
On the other hand, the noVNC software provides a TCP proxy between the VNC server running on the host and a browser that supports the HTML5 standard (browser capabilities can be tested at this link).
Combining this two technologies, the RVS and JNAAS start a VNC or a Jupyter server for the user on the host and redirects the connection to the user web browser using the TCP protocol.
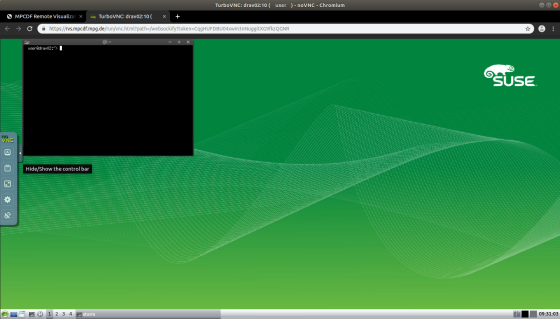
An example of a running session can be seen in the image above. Please note that the noVNC toolbar on the left-hand side of the browser window provides additional settings to personalize the connection, like re-scaling, full screen and a clipboard function that should be used when copying and pasting content between the user’s current desktop and the virtual desktop running in the browser.
Troubleshooting
In the following we present a list of the most common questions and problems users may encounter, with a suggestion on how to solve them.
The cluster where I want to submit my job does not appear in the list of available machines. The remote visualization and Jupyter services are currently supported only on ADA, DAIS, LEO, RAVEN, and ROBIN. If a cluster name does not appear in the drop-down menus, you may not be registered as an official user of that cluster. Please check that you can login directly via “ssh” to the cluster. If this is the case, but you still don’t see the cluster entry, please contact the MPCDF support.
I don’t remember my password for connecting to a session. If you forgot your password or if you want to change the list of default modules available in your Jupyter session, you can re-initialize your remote visualization and Jupyter sessions as described in step 1 of the Usage section. The new initialization will create a backup of your “$HOME/rvs” (containing the session logs), “$HOME/.vnc” and “$HOME/.jupyter” folders before setting the new password for you.
I have a ‘Xlib: extension “GLX” missing on display “127.0.0.1”’ error when I start software in a remote session. Software that uses the OpenGL libraries requires a remote visualization session on a GPU (not a ‘remote desktop’ session). In order to access the OpenGL libraries, you should run your commands with the prefix “vglrun” (e.g. vglrun blender, vglrun visit, vglrun paraview, etc.).
I want to load a module from my Jupyter session. You can list, load and unload modules available on the cluster directly from your Jupyter notebook using:
module('list')
module('load','module_name')
module('unload','module_name')
Note however that inside a Jupyter session the command
module('purge')
will not unload all modules, but will restore the Jupyter notebook to the initial state instead (with all the modules that were loaded when the notebook was first launched). Please note that for technical reasons it is not possible to module-load some Python modules that set the LD_LIBRARY_PATH variable from within a Jupyter session. Please put such environment modules into the list of Default modules for JN session to module-load them before the session starts.
The State of my session is PENDING for a long time. Usually, your session should start within a few seconds from the submission. If your session shows the PENDING status for a long time, all the available hardware resources may already be in use. You can try submitting a new session to a different cluster, or select a session that requires less resources. For example, selecting a Remote desktop instead of a Remote visualization session or a Jupyter session instead of a Jupyter for machine learning one increases the chances that a slot for your session is more readily available.
I have a ‘503 Service Unavailable’ error when I try to connect to the Jupyter session. When a Jupyter session is started on a cluster, it may take a few seconds for the Jupyter server to be ready and accept your connection. In case you see this error message, please wait a few seconds and then try again connecting to your session. If the problem persists minutes after the start of the session, please contact the MPCDF support.
The Jupyter kernel in my session is not behaving properly. If you installed conda environment in your home directory on the cluster or if you have other commands that are executed automatically in your bash configuration, the Jupyter session may not work as intended. In these cases, please deactivate your conda environment on the cluster and check that your bash configuration does not contain commands that are automatically executed at login time before trying again.
My session is killed a few seconds after starting. There are 3 possible reasons for this. a) One possibility is that a password was not set for the cluster where the session was submitted. In this case, please follow the instructions above and initialize your sessions. b) Another possibility (usually when requesting a Jupyter session) is that some python packages installed in the user’s home are creating conflicts with the software (Anaconda in particular) run by the remote visualization job. In such cases, please inspect the log files for the failed job in the folder $HOME/rvs on the cluster and check which package is creating the error or the conflict. c) Finally, the remote visualization service does not currently support zsh shell. If you are using this shell on the cluster where you are submitting a session, then all your requests (including the initialization of a new password) to the RVS server will be cancelled after a few seconds.
Robin
The Remote Visualization Service at MPCDF has recently been expanded with a new cluster called Robin, available only via the RVS web interface. Robin is our first compute cluster in the MPCDF HPC Cloud and can currently host up to 20 CPU sessions and 24 GPU sessions. RVS resources at Robin are available to all users with an account on our HPC systems (i.e. Raven and Viper).
Each session on Robin provides 12 virtual CPUs and 64GB of RAM, with GPU sessions having access to a shared NVIDIA A40 GPU (up to 2 sessions can share a single GPU). Robin mounts the Raven’s file system, providing access to all the software and data available on the Raven cluster, including the user’s home directory. A runtime of up to 7 days is currently allowed (with a plan to increase to up to 28 days of maximum runtime), but users are encouraged to stop their sessions once their calculations are completed and should be aware that long running jobs can be killed in case of maintenance of the cluster.
Users requesting GPU sessions are encouraged to limit the memory used by their code to roughly 1/2 of the available GPU memory (~24GB out of the 48GB available), in order to avoid disrupting the calculations of other users sharing the same GPU. This is particularly important for Machine Learning software (e.g. Tensorflow, Pytorch) that can allocate the entire available GPU memory for a single process.
Robin is designed to provide a single solution for the remote visualization needs of future HPC clusters at MPCDF: the file system of new clusters (like the upcoming cluster Viper) can be made available on Robin, providing easy access to software and data without the need of a dedicated installation of the Remote Visualization Service on each cluster.
Users interested in using the Remote Visualization Service on Robin are reminded to initialize their sessions on the cluster once (before submitting their first session) at this link, as described above.